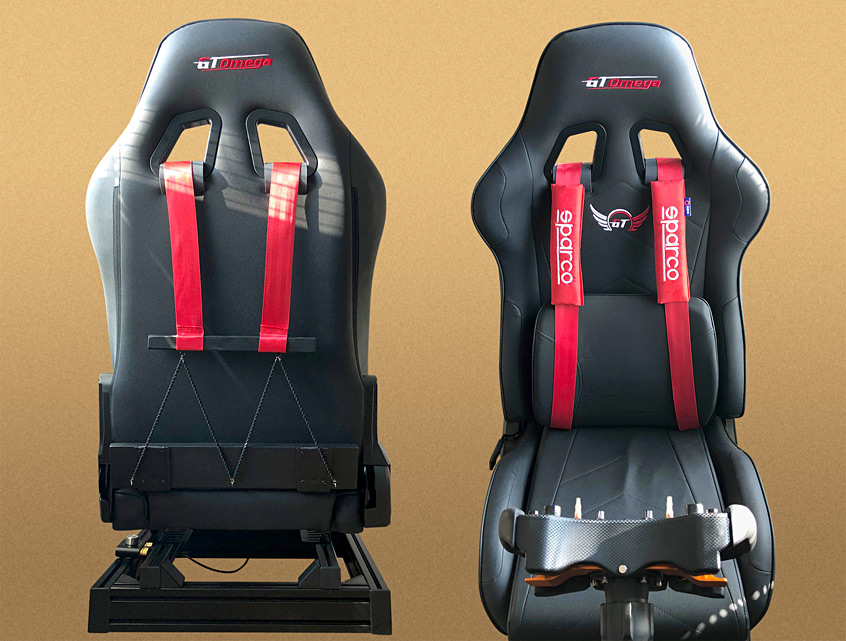
Sim-Racing - enhance VR immersion with a race harness that allows you to move in your seat
Any sim-racer who has tried racing with Gran Turismo 7 in VR (virtual reality) using a PSVR2 headset, will know that nothing else comes close to the sense of 3D immersion obtained without spending huge amounts of cash on a high-end VR headset and gaming PC with which to drive it. Sony's release of the PSVR2 virtual reality headset, together with its ground-breaking VR update for GT7, is a complete game-changer for the sim-racing world, as anyone who has tried it will know. After a week spent with GT7 and a PSVR2, going back to racing with one or even three flat-screen monitors is nothing more than a video game experience with all the adrenaline-inducing promise of a day at the launderette.
However, whilst sitting in your favourite virtual race car for the first time is an experience that you'll never forget ... exploring the dashboard and interior details, listening to the 3D spacial sound of the engine's roar, and feeling the bumps and rumble of the kerbs as you try to lose those extra tenths off your lap times, there is one thing that threatens to upset that sense of immersion, apart from the obvious lack of G-forces. You're in a powerful virtual race car; you look down to your lap and see the buckle of your virtual race harness; and yet you might as well be sat on your sofa because your body's senses are telling you that you are not wearing the race harness that your body expects to be hugging and protecting you from certain virtual peril if you spin-off the circuit. In my case the level of racing immersion was so great that I actually felt unsafe without a harness hugging me in my seat ...crazy eh!
You could splash-out and buy and then fit a proper race-seat-harness, as many flat-screen sim-racers do, but that brings a very specific problem to PSVR2 users apart from the obvious sweaty uncomfortableness of having heavy straps and buckles around your nether-region on hot summer days. I'm talking about the fact that tall European sim-racers (as opposed to Japanese games developers who are typically not very tall) usually need to momentarily move their body forwards and their head downwards when GT7 switches into 'VR mode' at the start of every race, so that when they then sit back in their seat, they don't find themselves sitting too far forwards and/or low-down in their virtual car. How can you momentarily adjust your head position at the start of each race if you are tightly strapped into your seat? ...you can't!
Another VR-specific problem for GT7 sim-racers is that of moving about in one's seat and ending up in the 'cage of VR blindness' (whereby the 3D world suddenly gets replaced by a green outline of the car's extremities) simply because your head moved outside the specified play-area. This is a funny phenomena for those watching someone driving in VR, especially if they are virtually off-roading or rallying. When driving a real car, if it lurches to one side or flies over a ramp, the driver instinctively moves their body-weight to compensate for the imbalance and/or to ready themselves for the coming impact. Even when cornering hard but flat in a GT racing car, the driver still instinctively moves their body, which apart from looking hilarious to anyone watching the VR racer in their sim-rig, also risks their head crossing the boundary into the 'cage of VR blindness'. A seat harness with some flexibility, whilst not being a perfect solution to this problem, certainly helps.
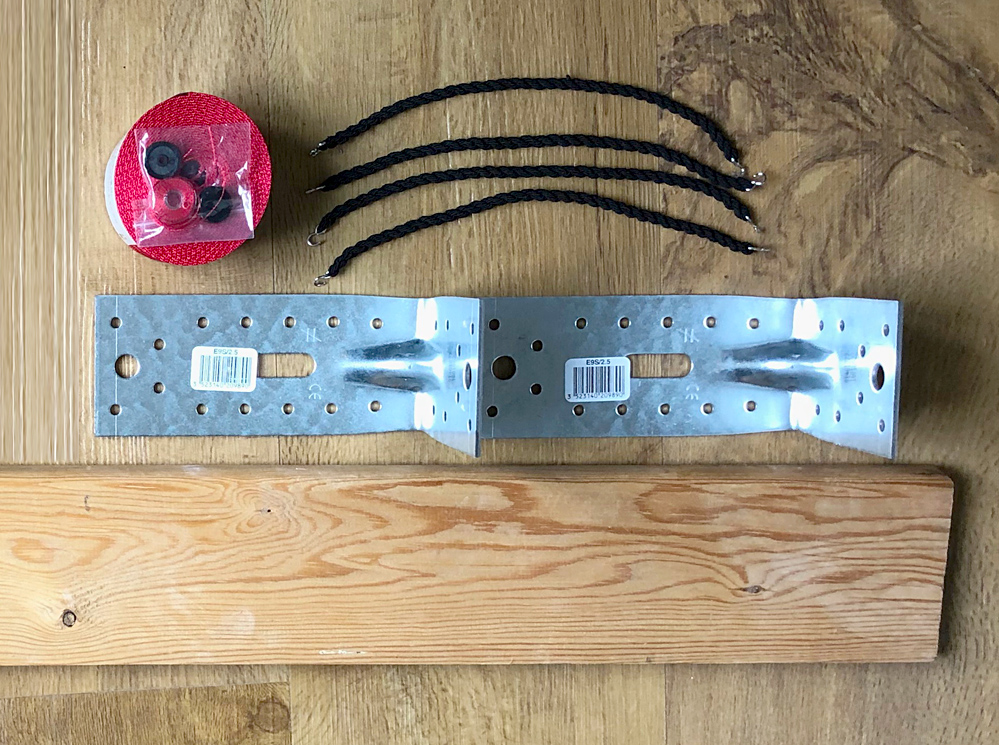
The bungee-cord problem was solved when I recalled that in my military days, we used to wear very thin but exceptionally stretchy small bungee cords to 'blouse' our trouser bottoms around our high-leg boot tops. Called blousing garters, these are readily and cheaply available from Amazon in packs of ten pairs for under £10, although two pairs is all we need for this application. Finally, a 3.5 metre roll of proper seat-belt webbing is again cheaply and readily available online, being (in my experience) exactly the same product as used by high-end German car manufacturers.
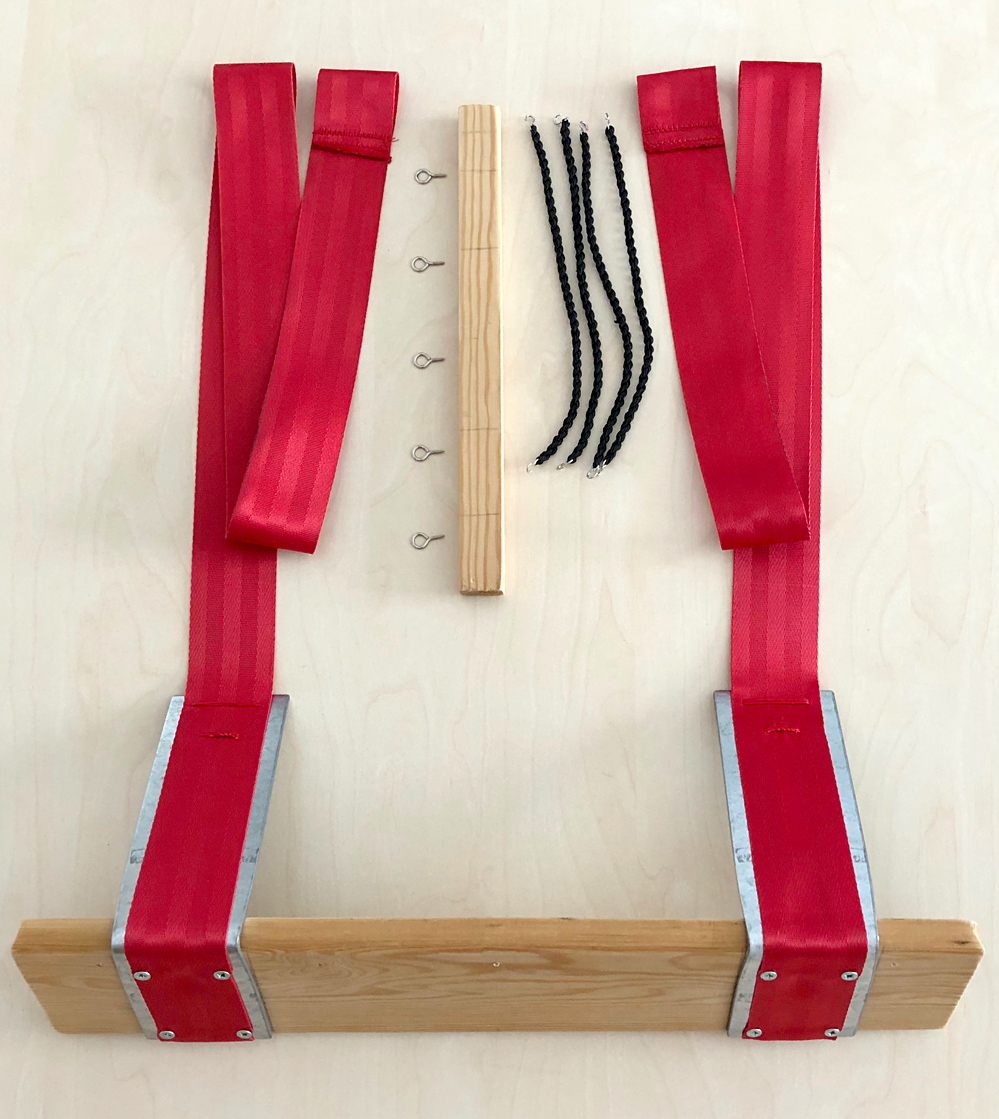
Equipped with these materials (and another piece of wood and some eye-hooks), I will now explain how I put everything together, although you don't have to use angle brackets – you could simply anchor the webbing to a broom handle or a piece of wooden batten, and if you don't use a lumbar cushion, or if you need to cut two small slots in the base of a fixed-back bucket-seat, you could simply pass the straps under the seat-back (or through the slots you've cut) and forget the idea of bringing the lower-anchor-points forward.
Also shown below is a small piece of wood that we are going to use as an anchor for the top ends of the straps, along with four blousing garters and five screw-in eye-hooks of the type available in most hardware stores.
Once you have secured the straps to the lower anchor-plate as shown, add three eye-hooks to the bottom of the anchor-plate as shown in the title picture at the top of this page. Do not screw them into the top of the anchor-plate else the blousing garters will be higher up the seat, as will be the top anchor-batten, and this will reduce the range of movement available from the finished straps. Now pass the straps through the seat base (or cut slots) and pull the anchor-plate into position.
Behold ...drum roll... : my not-quite-as-smooth-as-rollers solution that is cheap, temporary i.e. no holes in the seat, and visually subtle (although a black finish would be better):
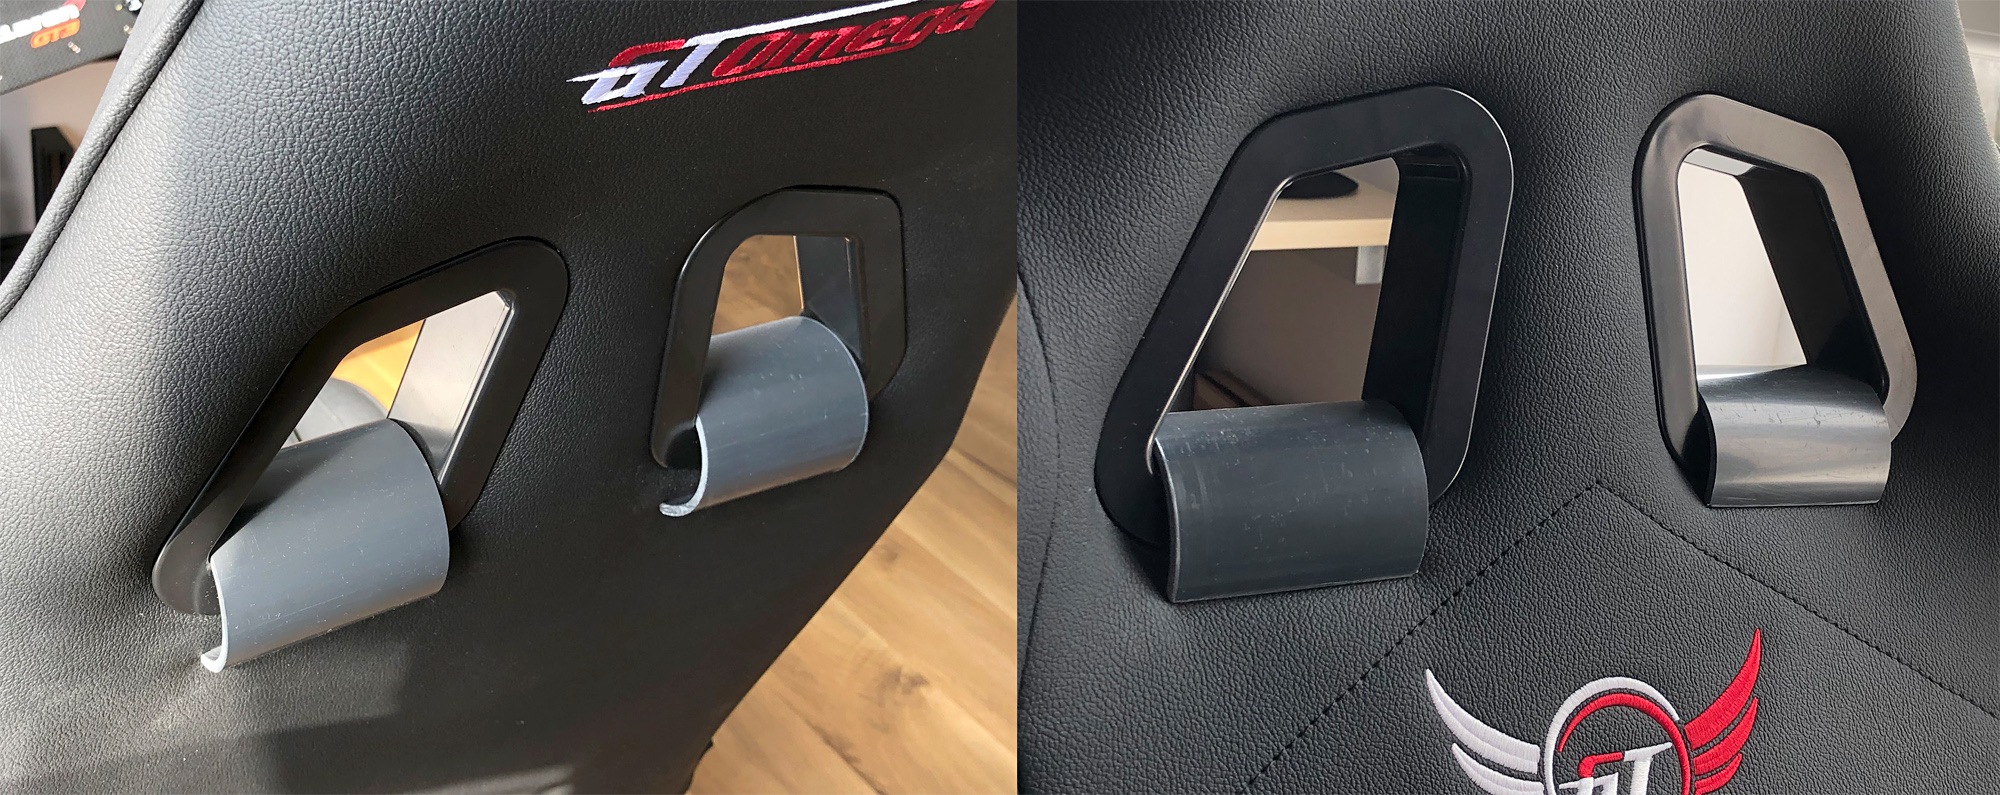
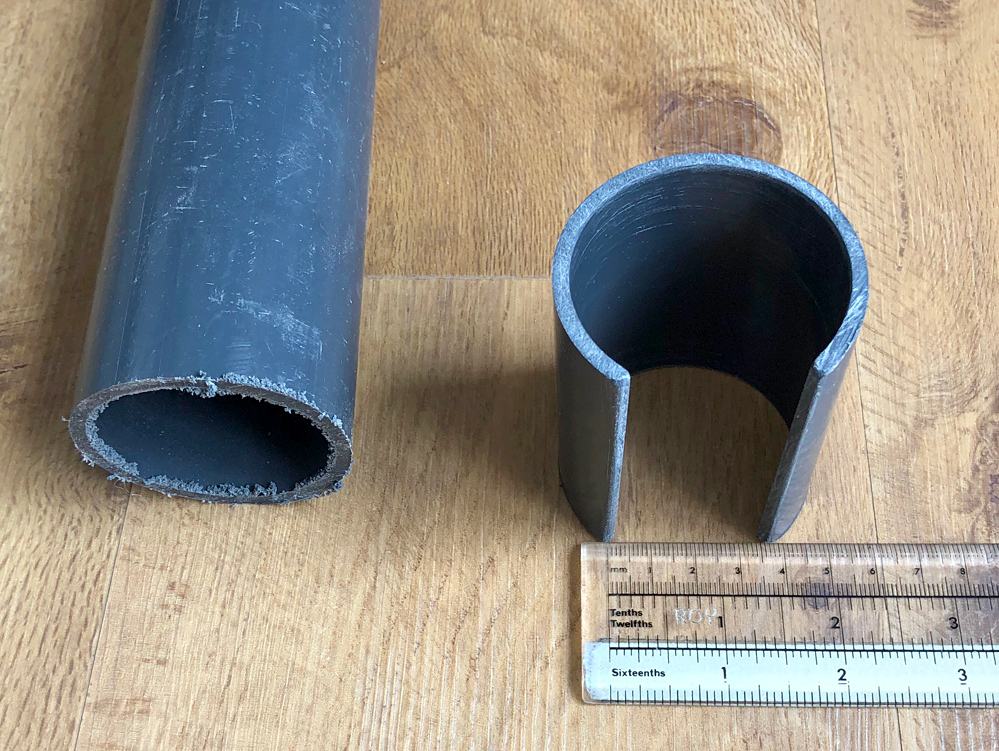
"That looks like plastic pipe" I hear you cry. And you would be correct ...60mm heavy-duty plastic pipe to be precise (something like this although I had some in my garage). The exact diameter and cut-size will depend upon your seat model so a little experimentation might be needed, but if you have a GT Omega XL RS racing seat like mine, this picture below might help you.
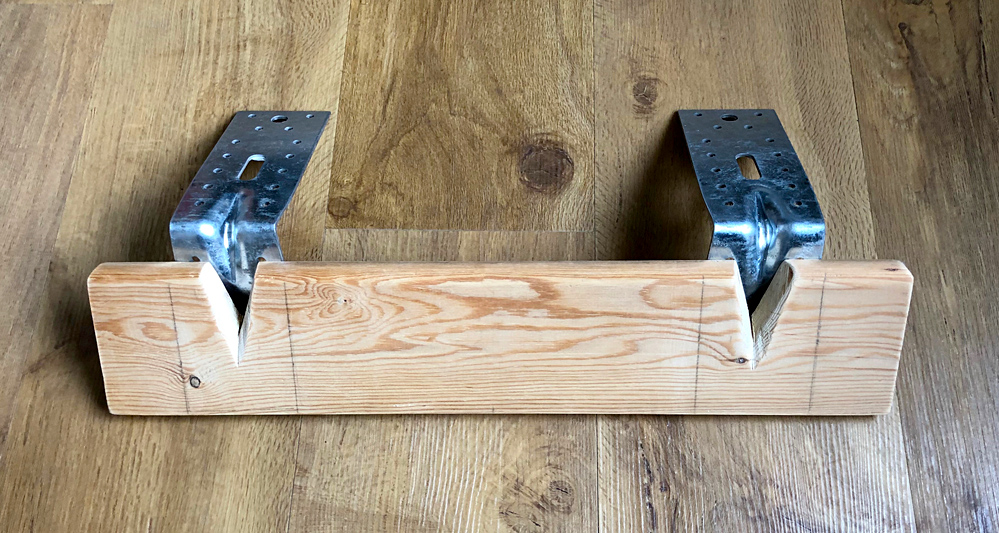
Now you can pass the two straps on the seat's base up and over the simple runners and hang them down the back of the seat. Temporarily anchor the straps to a small batten of wood, and screw in two eye-hooks as shown below. Now attach four blousing garters as shown. You don't have to use four – if the finished harness is too tight for you, remove one or two garters, or if you would prefer it to be tighter, double-up one or more of the garters. The strength of the 'pull' is entirely adjustable.
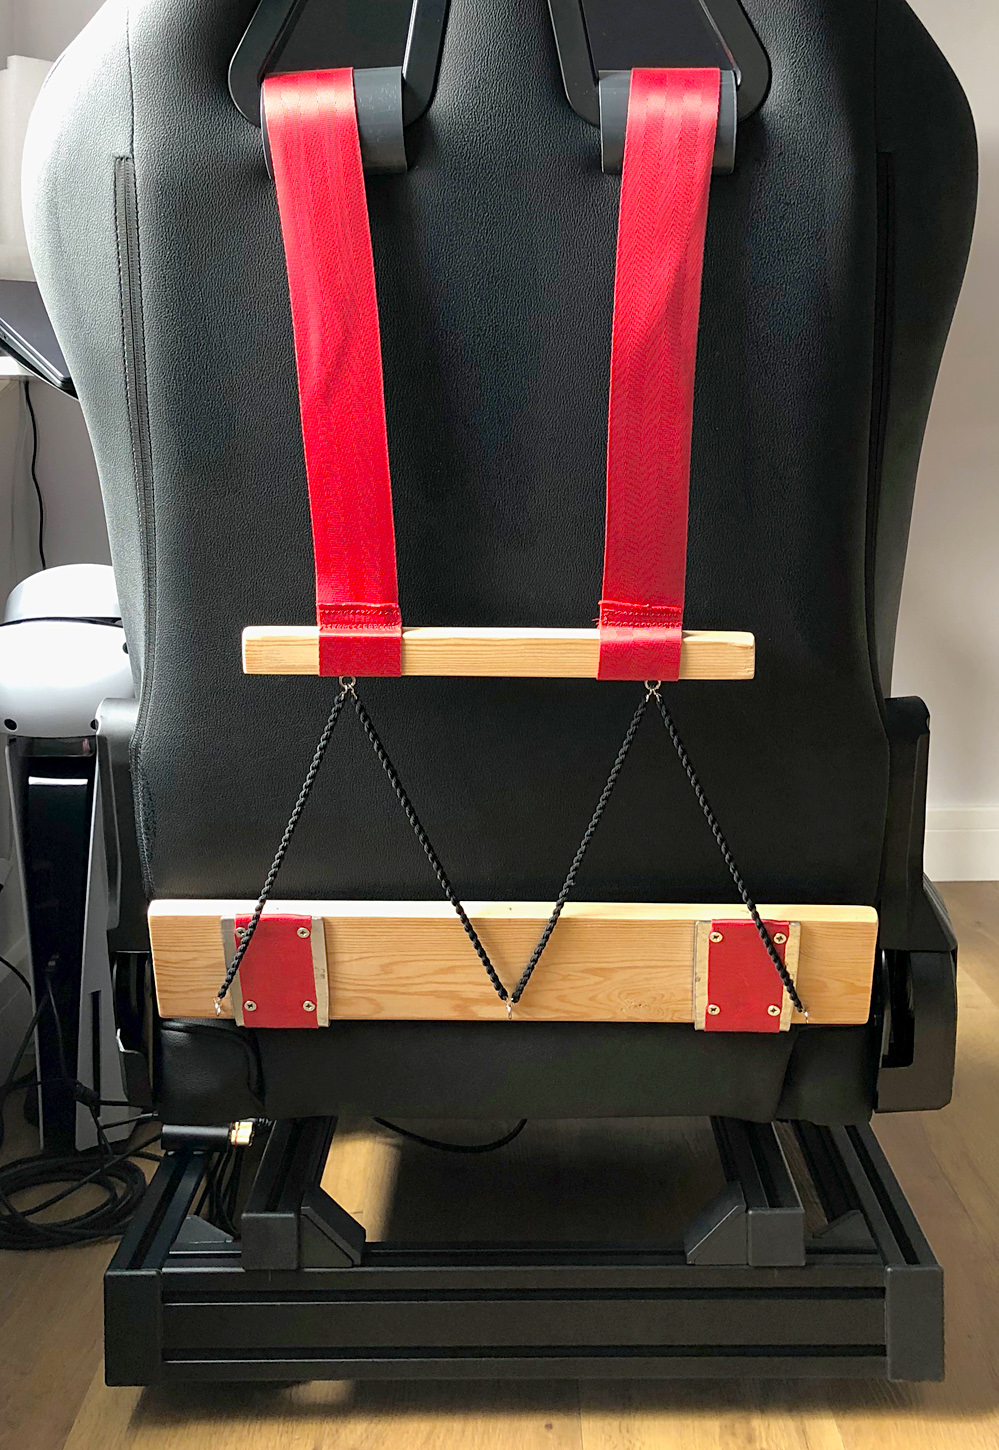
The horizontal spacing of the straps on the top batten needs to be such that when the mechanism is extended fully upwards e.g. when getting in the seat and harness, the straps sit comfortably within the cut-out zones (for my seat this is around 150mm between the centres). The width of the batten needs to be a little wider than you might think is ideal, as shown here, because when you get into the seat you will pull on only one strap at a time, and you don't want the batten to try and escape forwards through the seat cut-out – the extra width acts as a stop against the cut-out frame when pulling only one strap.
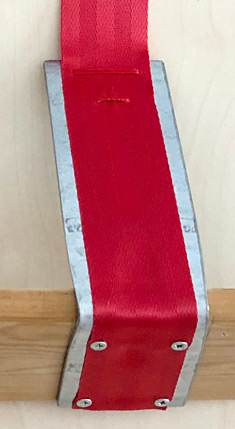
Once you have worked out the ideal position for the upper batten, you need to permanently stitch the ends of the straps into loops (as shown above), through which you can pass the batten. I did this by hand but after seeing my lovely needlework, my GF very diplomatically offered to re-do them on her sewing machine. Even still, I managed to end up with the 'worked' side facing outwards whereas obviously it would be neater the other way round (learn from my mistake). Don't forget to run a lighter-flame along the cut edge of the strapping to stop it fraying.
With the assembly constructed in this way, if you ever decide to remove it, you only have to unclip the garters, unscrew the two eye-hooks in the top batten (which are screwed through the straps to secure the assembly), and then slide the top-batten out of the strap loops. The whole thing then slides away and/or unclips without a single mark on the seat ...I love it when a plan comes together! Incidentally, another bonus of this mechanism is that you can choose to race without the harness if you wish, without having to worry about where to put the lap straps and buckles – simply sit normally in the seat on top of the buckleless straps.
The finished assembly allows for about 300mm of harness extension depending on your seat type. This means that you will have to shuffle about a little bit to get seated inside the harness, one strap at a time, but I have spine problems and it doesn't cause me any grief. So unless you are particularly large, you should be fine. The four garters configured as shown provide exactly the right level of harness snugness for me, whilst still allowing me to move my head during the VR head positioning routine at the start of every race. And without any lap-straps and buckles, my nether-region doesn't get any hotter than it already does on hot summer days down the virtual track.
Incidentally, if you are ever particularly hot whilst sim-racing, choose a race with changing weather for when it starts to rain, not only does your brain conjure up the smell of wet grass and tarmac from its memory banks, but I'll swear you can actually feel the temperature drop ...such is the level of immersion inside the GT7 VR world.
To finish up, I recommend buying some seat-belt comfort pads as the straps can cut in a bit if you move about a lot wearing just a tee-shirt - my red Sparco pads shown below were bought new on eBay for just £10.50. I also recommend painting the finished assembly with black acrylic paint of the sort cheaply available from a hobby-shop. If you are wondering about the lumbar-cushion, it was the only non-memory-foam one I could find (I need support when braking, not something that is going to change its shape) and it just so happens to match my seat perfectly. It comes from Argos, costs just £15.50, and I can absolutely recommend it.
If you follow this guide, please let me know how you get on by leaving a comment below. I write these blogs to help people, so it's nice to know if I'm wasting my time or not.
