Sim-Racing - add isolated haptic feedback transducers (bass shakers) to your rig

In the context of a sim-racing rig, adding haptic feedback involves taking telemetry data from whatever sim-racing software is being used, and turning it into realistic rumbles and vibrations that accurately simulate what might be felt if one were sitting in a real moving race car e.g. engine vibrations, road imperfections, kerb rumbles, collisions etc.
Building on collective wisdom
Sim-racing has become incredibly popular in recent years, due partly to the various Covid lock-downs, and because tactile transducers (bass shakers) add so much to the feeling of immersion, haptic feedback has also become popular. Dozens of videos have been made by YouTubers keen to show people how to install a basic bass shaker system, and literally thousands of forum posts contain the discussions and wisdom of enthusiasts who have tried various solutions with mixed results. I have taken the approach of wishing to stand on the shoulders of giants, so I have read until my eyes felt like sandpaper, consulted fellow members of the GTPlanet forum (thanks all), and generally absorbed everything I could find on the subject of haptic feedback for sim-racing that doesn’t involve spending a small fortune.
Those who are considered to be experts on the subject suggest that isolating the transducers from the frame of the rig is the best way to go, and basic scientific logic dictates that they must be correct. But nowhere have I been able to find an explanatory guide as to how to go about this. The gurus among the sim-racing community also suggest that positioning multiple transducers of different sizes in various places enables one to 'layer' different effect frequencies on top of each other in order to fine-tune the haptic feedback to very specific parts of the body. Again this is surely correct but I have neither the time nor the money to take this approach, so I have gone for the simplest (ish) and cheapest route in the first instance, knowing that I can add more transducers later if I wish.
So without further ado, and with gratitude to all those giants upon whose shoulders I stand, there follows what I think is the first walkthrough of how to build a basic isolated transducer haptic feedback system for an '8020' aluminium extrusion sim-racing rig. Whilst I am an ex-engineer, I am not an acoustics expert and I am just as fallible as the next sim-racing enthusiast, so if you feel anything that follows is wrong or could be improved, please add your comments below.
The quest for total immersion
In terms of the ultimate immersive racing experience at an affordable price, at the time of writing, nothing can beat Gran Turismo 7 (GT7) played in virtual reality (VR) using Sony's PSVR2 headset, together with a set of lightweight headphones to reproduce Sony’s impressive 3D sound. At around £530 for a PSVR2, sim racing in virtual reality is not cheap, but once experienced (after the brain gets used to the fixed-focus nature of the optics, and the lack of G-force that can sometimes cause mild nausea the first few times of use), racing in VR suddenly makes flat-screen sim-racing seem totally redundant (so say I and most GT7-using PSVR2 owners).
The problem with this total visual and aural immersion though, is that despite the haptic feedback of the force-feedback steering wheel, road vibrations and kerb rumbles suddenly become very noticeable by their absence (if you are used to driving or racing for real). To counter this, and to increase the immersion even further, we need to introduce haptic feedback to our sim-racing rig.
The usual method for adding haptic feedback
The tried and trusted method of introducing haptic feedback to a rig is to install bass shakers (tactile transducers), which are essentially sub-woofer speakers without the cones that would otherwise turn low-frequency sound signals into sound waves. One bass shaker attached under the seat is often a good starting point, but this can easily vibrate through the entire rig and into the floor, upsetting the household and even the neighbours. Adding multiple transducers in different places can increase the immersion, but there is a fatal flaw in this concept that usually gets overlooked: that of mechanical noise transfer whereby sound travels very efficiently through solid objects.
Rigidity is a double-edged sword
The single most important factor when building a sim-rig is rigidity or lack of flex. The higher the quality of the rig, the better the rigidity and the less flex in the frame between seat and pedals or seat and wheelbase. It is highly unlikely that a few millimetres of flex is going to be noticeable to even the best of drivers, but rightly or wrongly, this has become the default measure of a quality racing rig: complete rigidity; zero flex. So when you strap or bolt a bass shaker to one part of the rig, its effects are going to travel to every other part of the rig due to the mechanical transfer of vibrations along the tightly bolted-together framework.
One off-the-shelf shaker system on the market involves bolting a transducer to each corner of a racing rig to simulate what is going on at each wheel of the virtual race car. But all the vibrations from each transducer end up traveling directly along the framework in one big mess of rumbles and noise that merge together and sometimes even cancel each other out! This is not rocket science, it’s very simple science, and it can make for a lot of wasted time and money.
Isolation is the key
The logical solution is to feed the appropriate telemetry 'haptics' to the driver's body in isolation from each other, where, and only where, it expects to feel them. Ignoring G-forces which cannot easily be reproduced, when one sits in a car, one feels road noise, engine vibrations and other sensations through the body’s three contact points: the seat, the steering wheel and the pedals or foot-well. A good force-feedback wheelbase will take care of reproducing the sensations of the steering wheel contact point, which leaves the other two: the seat and the foot-well.
Containing the vibes
Isolation or containment of sound waves is key to making haptics work. Not only in maximising the separation between the front and rear haptics, but also in reducing - as much as possible - the vibrations feeding from the rig to the floor and on to the rest of the building. But isolating mechanical sounds involves adding rubber mounts and avoiding metal-to-metal contact, which can introduce flex into the system, so we need to be smart with how we go about this.
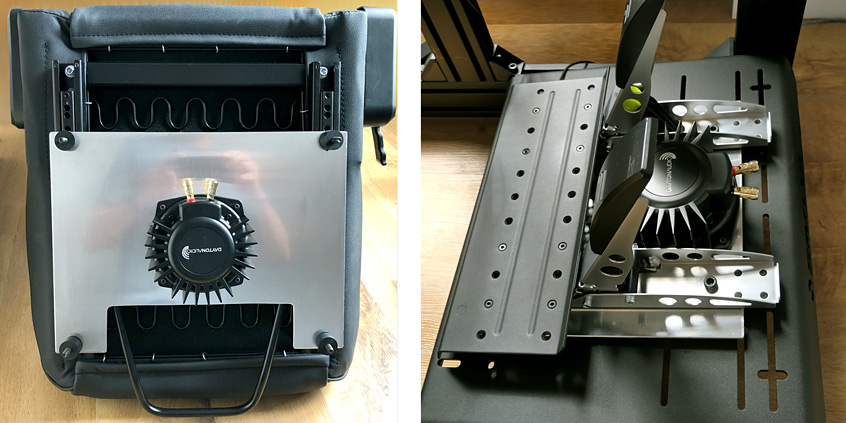
In essence, we need to bolt our rear transducer directly to the base of our seat, then add some rubber vibrational cushioning between the seat's frame and the seat's mounting bracket or rails, whilst removing all direct metal-to-metal contact.
We cou
The telemetry software
When it comes to using a signal to drive our transducers, we could start with a basic audio feed from the sim racing game, but there is a terrific program called SimHub which allows us to extract and manipulate mutli-channel race data coming direct from most sim-racing titles including GT7. SimHub is available for free, but most people are happy to contribute between 10 and 20 Euros for a licence. It can be downloaded from https://www.simhubdash.com
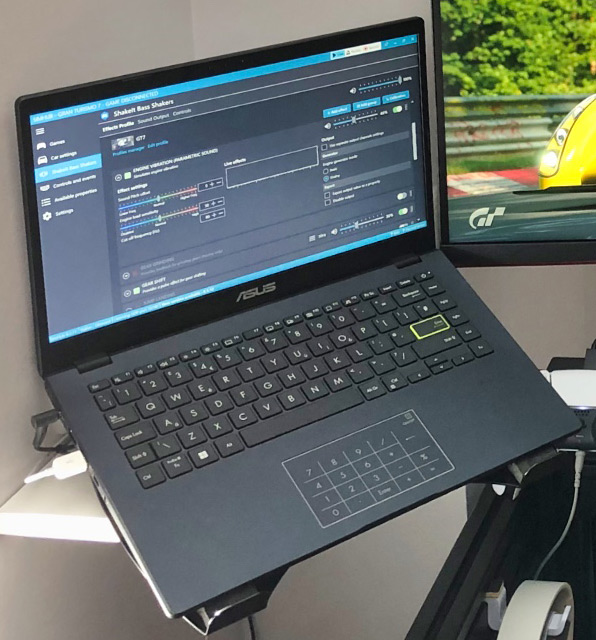
SimHub is not the most intuitive program to set up and run, and the documentation could definitely be better, but there are plenty of web articles and videos on YouTube which walk you through the process. You also have to open up two ports on the PC to allow the GT7 telemetry to get through the PC’s firewall, but again, Google is your friend here. What I can say is that it’s all doable at the expense of a bit of time and head scratching.
One thing I would add is that I noticed a roughly half-second time lag between things happening in the game, and feeling the effect through the transducers. This is a widely reported issue with no common solution. However, I found that connecting to the amp via a USB cable instead of Bluetooth reduced the lag, and then going into the SimHub Settings menu and disabling all Games except GT7, and all Plugins except the Shakeit Bass Shakers, effectively eliminated the lag after a restart.
What you'll need...
The audio equipment
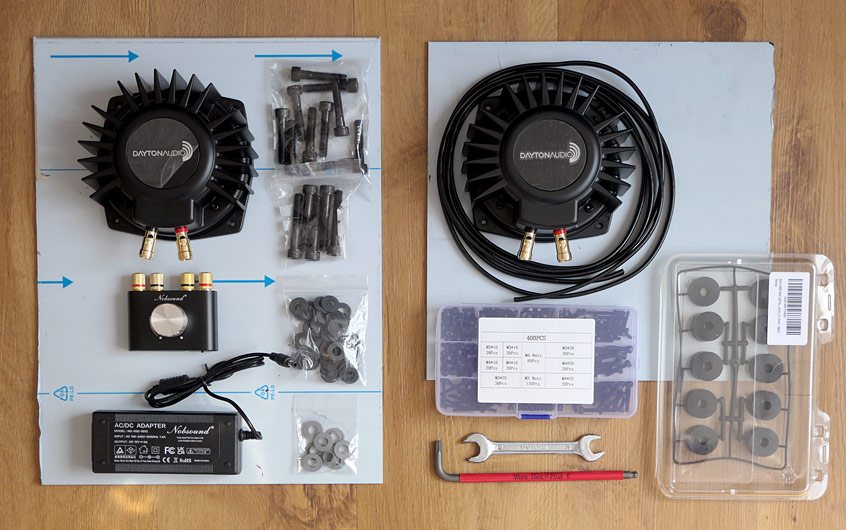
There are dozens of different audio solutions available with regards to sound-cards, amplifiers and transducers, most of which are quite expensive. You are free to use whatever equipment you wish as what follows can be adapted to almost any equipment on any aluminium profile or tubular rig. However, given that one particular combination of tried and trusted products is considerably cheaper than all others, these particular products (shown above) are what this article covers:
1 x amplifier with integral sound card and USB cable:
Douk Audio Nobsound NS-01G Pro (around £32 including delivery)
For example: https://www.ebay.co.uk/itm/264425791362
2 x 50W bass shaker transducers:
Dayton Audio BST-1 (around £45 each including delivery from the Netherlands)
For example: https://www.soundimports.eu/en/dayton-audio-bst-1.html
2m x black QED 79-strand speaker cable (around £7 including delivery)
Total = approximately £129 plus bolts and washers.
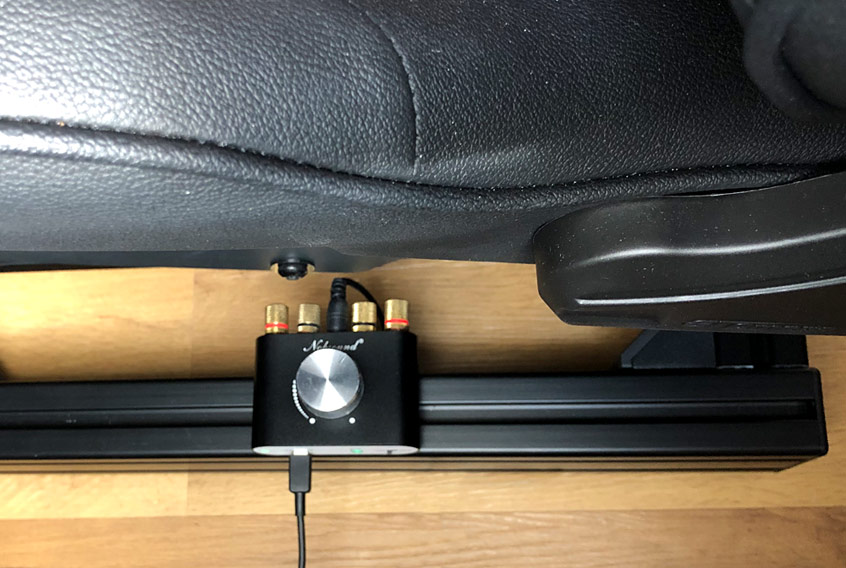
The speaker-wire connection from the amp to the transducers is very simple; just make sure that you connect positive (red) on the amp channels to positive (red) on the transducers. There are two channels available: front and rear, which you can assign in SimHub as you wish. If you are using black speaker cable, one of the wires will have a slight ridge running down its length so that you know which wire is positive. You should be able to feel this ridge by brushing your thumb across the edge of the cable.
You can, if you wish, temporarily wire up the audio components to make sure that a test signal from SimHub vibrates each transducer as expected, before moving on to the installation. If you want to check that the feed from GT7 is working, be aware that no data is sent to the PC until a race or mission actually starts i.e. the game goes into VR Mode if using GT7.
Make the seat transducer mount
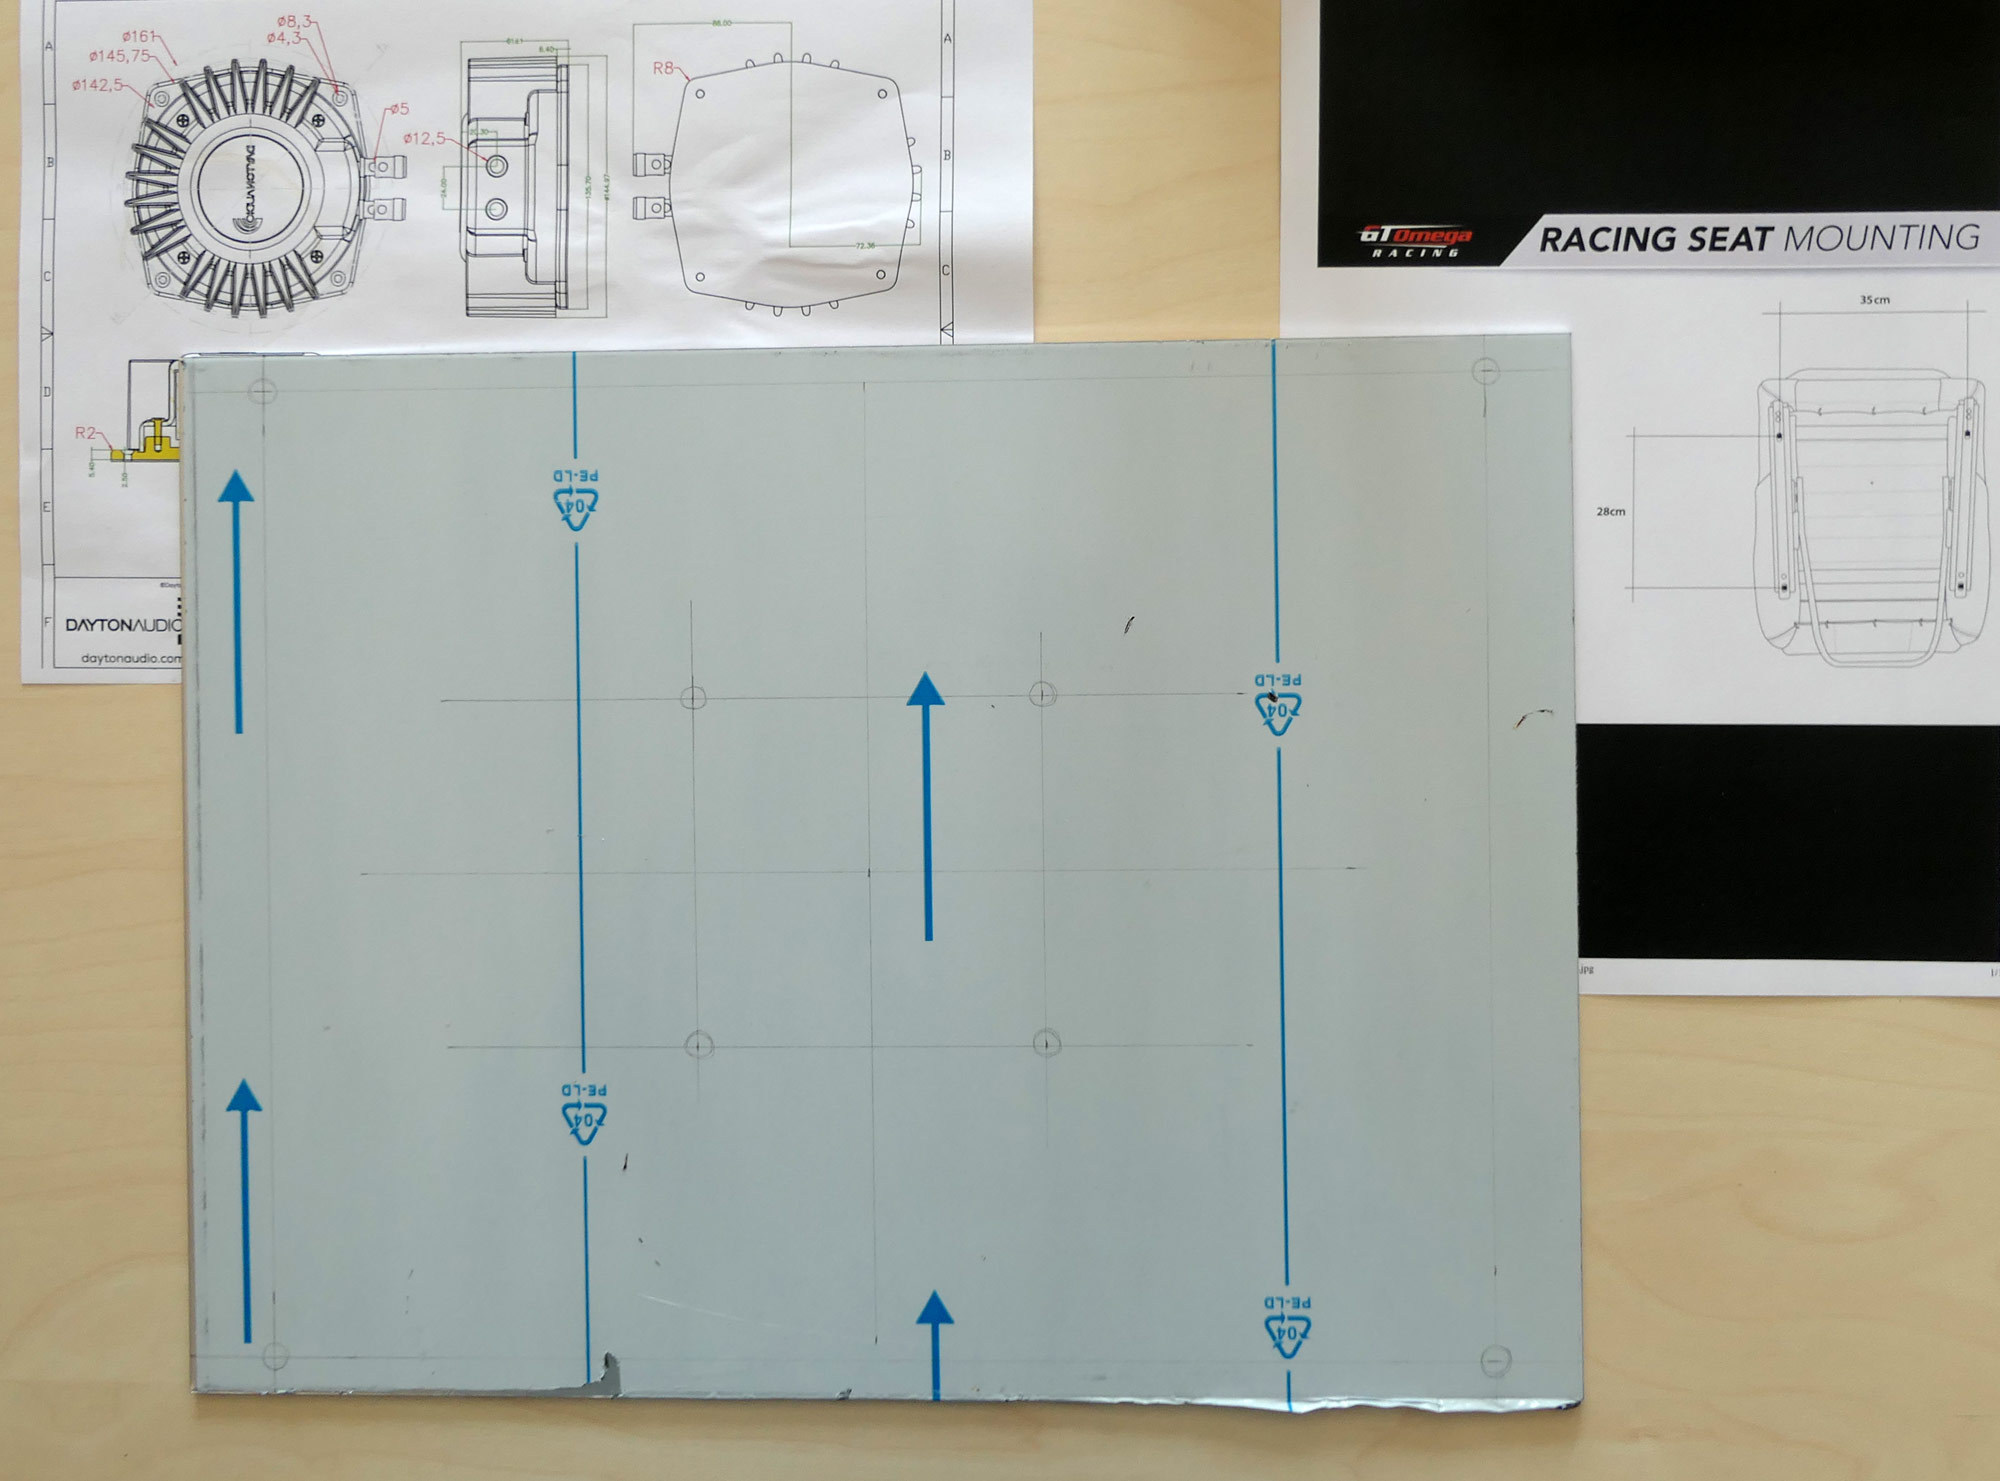
Some people bolt the rear transducer to a wooden board mounted beneath the seat, others buy a large VESA TV adapter plate because it has four 100mm spaced holes pre-drilled. Personally, I bought a sheet of 3mm thick aluminium plate from Aluminium Droitwich (on ebay) for just £14 including delivery. Aluminium is relatively light and soft enough to drill and file easily, yet rigid enough to mount the transducer perfectly.
I have a GT Omega XL RS racing seat, which is a recliner with adjustment rails. Its mounting points are 35cm apart in width, and 28cm apart front to back. Hence a 400mm x 300mm sheet of aluminium is the perfect size, requiring no cutting except to allow space for the rail adjuster handle (which I did not realise would be a problem when I first marked it out for drilling).
Be careful when handling the plate as it could have sharp burs along its edges. One face will have protector-film on it (shown above), which serves as a surface to mark it out for drilling. If you are not able to work out where you need to mark the plate for drilling, either get some help or pay a local workshop to fabricate it for you.
Once marked-up, use a hammer and centre punch (or masonry nail) to mark where you need to drill your holes. Standard HSS drill bits are fine for aluminium but wear gloves and eye protectors as the soft aluminium will form long swarf-tails which might fly out of the bit’s flutes at speed. It is also worth mentioning that before drilling, ensure that the plate is clamped down and/our held firmly in place by a friend wearing thick gloves.
When the drill bit bites into the soft aluminium, if the plate is not held firmly in place, the drill bit could snatch the plate which might then rotate around the drill bit, hitting your leg! Experienced engineers and mechanics will know this, but I guess it’s worth pointing out if you are about to drill aluminium plate for the first time …secure the plate, drill at a reasonably fast speed, and wear a workshop apron or thick jeans in case anything becomes insecure.
The four holes for the seat mounting bolts will probably need to take M8 bolts, so drill 9mm holes. The four holes for the transducer will need to take M4 bolts, so drill 5mm holes. Once the holes are drilled and an area is removed for the seat rail handle (if necessary), de-bur the entire plate (use a large drill bit to de-bur the holes) and use a file and/or emery cloth to make all the edges smooth to touch - check this by brushing your thumb perpendicular to the edge, not along its length. File the four corners slightly round. In short, hands might stray near this plate once in situ, so make sure there are no sharp edges or corners.
Remove the protective film, clean the plate ready for fitting, and tightly bolt the rear transducer to the plate using four M4 nuts and bolts.
Fit the seat transducer mount
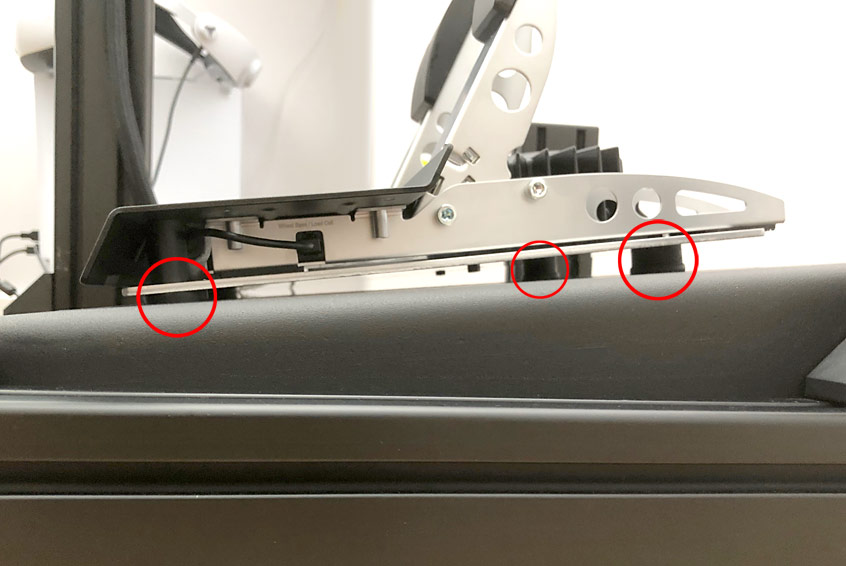
My GT Omega seat is fitted to a Trak Racer Universal Seat Bracket (shown below) to give it extra height and to allow an incline of the seat base for comfort. My transducer plate fits between the seat runners and the seat bracket (shown below), but what follows can also be applied to the mounting point between a seat and the rig’s seat rails if no bracket is used (perhaps with an extra mounting plate or bracket if necessary).
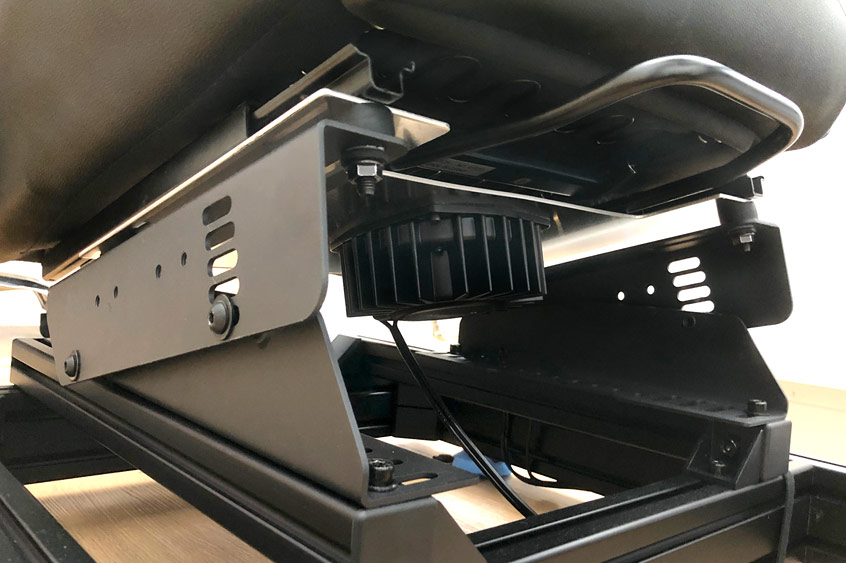
Ordinarily you might use an M8 nut and bolt to secure the seat directly to the seat bracket, but what we are going to do now is to use longer bolts and 15mm rubber standoff washers. To prevent the point of each metal bolt (the nut-end) coming into direct contact with the metal of the rail or bracket, we will use an M8 nylon shoulder washer, and between this and the nut or metal washer, we will use two M8 rubber washers. Thus the bolt heads will be in direct contact with the seat base and transducer plate, but not with the seat rails, brackets or rig frame below.
The beauty of using these various standoff washers in combination with the tightness of the bolts, is that the whole set-up can be fine-tuned to suit your particular rig and preferences, which cannot be said for using fixed bobbin fittings. You can use standoff washers of a different height and/or hardness, and can tighten or loosen the bolts to further affect their rigidity. I found the best balance with the seat isolators to be 15mm A85 washers tightened until there is a very slight visible bulge to the washers.
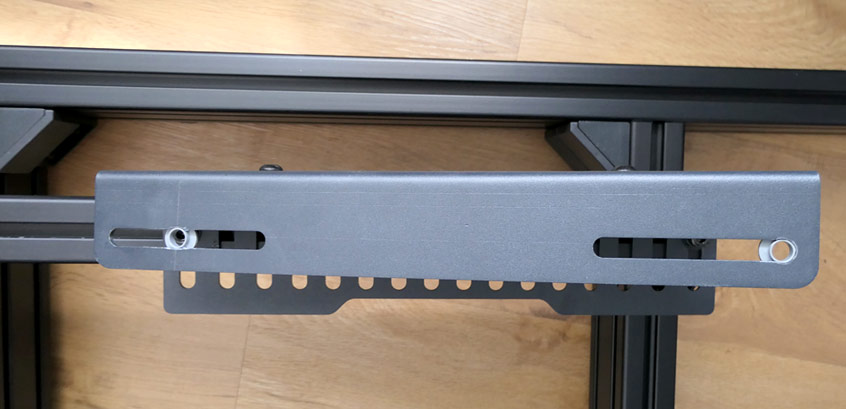
Note that an M8 shoulder washer needs a 10mm hole as it fits inside the hole whilst still leaving room for an M8 bolt. This means that you might need to file or drill out the 8mm or 9mm holes or slots in your seat bracket in the correct locations (shown above). Be very careful if drilling as the chances of the drill bit snatching and pulling the drill downwards from your hands will be high. Hold the drill very firmly, use a high drilling speed and sink the bit in very slowly. If in any doubt, enlarge the holes with a rat-tail file.
Calculate the required bolt lengths very carefully. In my case, each bolt goes through a 2mm thick seat runner, a 15mm standoff washer, a 3mm thick aluminium plate, a 2mm thick shoulder washer, two 1mm thick rubber washers and a 1mm standard washer. Add the 9mm thickness of a nut and we end up needing a bolt of at least 34mm, so I used M8-40 bolts (meaning: metric thread, 8mm nominal diameter, 40mm long excluding the head).
If you are bolting directly into aluminium profile slot-nuts, you will need to calculate the bolt length particularly carefully as there is only so much room to spare on the back of the slot-nut. You will also need to fit the shoulder-washers and rubber washers above the isolation plate as the bolt is always going to directly contact the slot-nut and hence the rig frame. It may even be that you need a completely different approach if your seat is bolted directly to the frame, but the principle of avoiding metal-to-metal contact should be followed regardless.
Make and fit the pedal-base transducer mount
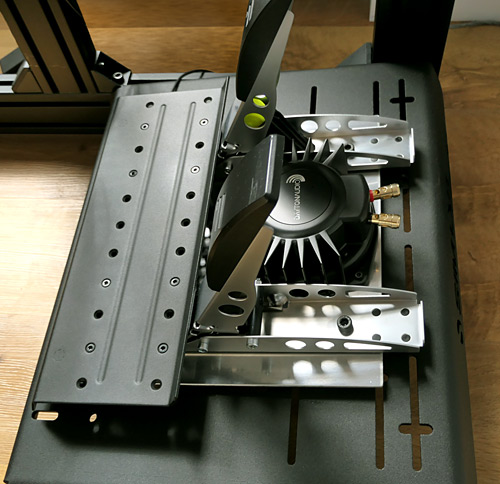
I have Fanatec CSL pedals which attach to the pedal-base with two M6 bolts from below (at the front), and two M8 bolts from above (on the pedal frames) using normal nuts. All I’ve done is create an extra pedal-plate sat on standoff washers, held in place with longer bolts fed through the original fixing points.
I found that comparing the vibrations of a SimHub test signal between the front and rear transducers led to a huge difference in amplitude/effect. Rightly or wrongly, I reasoned that this is because the rear transducer is mounted on a large plate that amplifies the vibrations like a drum, whereas the front transducer is mounted within 40mm of the plate’s mounting posts, which prevents any mechanical amplification. My thinking, therefore, is that the front of the pedal plate needs to be quite tight to the rig plate to prevent flex, but the rear can be higher and looser to allow a little more movement of the transducer. This seems to work well in practice but feel free to experiment. If you would like more amplitude at the front and don’t mind a little flex, use taller and/or softer standoff washers and don’t tighten the bolts too much.
I bought a 300mm x 300mm sheet of 4mm thick aluminium plate from Aluminium Droitwich (on ebay) for £14 including delivery. I tried various standoff washer heights and hardness types, and settled on 10mm A85 washers on the front, with a combination of 10mm A85 and 5mm A55 washers on the rear. Look closely below and you can see how the soft 5mm standoff washers bulge much more than the hard ones above them. If you don’t want to buy two different types of washer, 15mm or even 20mm A85 washers should be fine on the rear.
All of my notes above about drilling safety and de-burring the plate apply equally to the pedal plate modification as to the seat plate mod.
Note that if you use Fanatec CSL pedals, the bolts for the front of the pedal-base need to be M6 and of a length (or packed with washers) such that they protrude 22mm above the new aluminium mounting plate. Also note that if you use two Fanatec CSL pedals in ‘kart’ configuration (i.e. spaced apart), the BST-1 transducer fits perfectly snuggly between the two pedal frames. However, because the new plate is so close to the original pedal deck, you either need to fit the M4 transducer bolts upwards with the nuts on top, or file off any of the bolt’s thread length that produces beyond the nut, else it might foul the pedal deck. Obviously the later method makes for a neater finish.
If you use other pedal types, you may need to extend the new aluminium plate such that the transducer sits much further forwards, in which case its vibrational amplitude/effect will be much more noticeable. The combination of both transducers gives more haptic feedback than you’ll ever need or feel comfortable with, so even with a snug fit, there’s more than enough power in the front bass shaker.
Does it work?
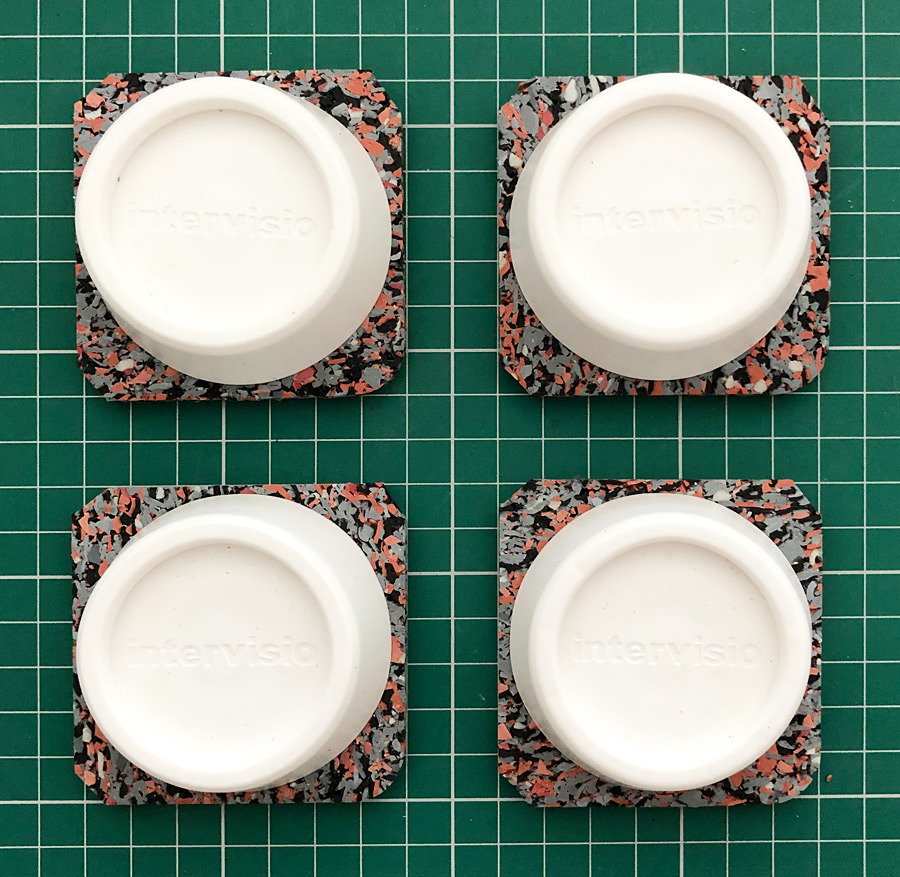
If the transducer's amp is turned up too much, the rig's entire frame vibrates loudly when driving through a gravel-trap, for example, so the isolation mounts obviously have a limit to their effectiveness. But at normal levels of amplitude, and with washing-machine pads and mats (shown above) under the rig's feet, no noise escapes into the rest of the building other than the occasional curse following a miss-timed late-braking manoeuvre.
SimHub settings for GT7 with a Sim-Lab Evo cockpit
The maxim for haptic feedback is ‘less is more’, which means don’t have everything blasting away at full volume else all you’ll end up with is a colossally noisy mess of vibrations.
I noted the sensations that I could feel during a trip down a motorway in my real car, and was surprised at how many things I normally don’t notice. Engine vibration was evident mainly through the foot-well and slightly through the seat, so this is how I set it up in SimHub. I run it at 45% (master) with 100% to the front and 25% to the rear, but this is going to be influenced by the particular rig you use, the virtual car you drive, and the master volume on the amp, so mentioning it here could be misleading.
The thump of a gear change is very satisfying, especially in a GT3 car, but don't go too mad with this effect else you'll drown out other sensations. I run it at 35% (master) with 100% to the front and 60% to the rear, but again this could be misleading.
GT7 does not provide ABS telemetry but if you use the Wheel Lock setting to provide a 33 Hz tone once the pedal exceeds a 10% threshold, you end up with a pulse through the pedals not unlike what you might expect from an ABS when in action. This pulse seems to be present under almost any braking action so either my virtual wheels lock-up far too easily, or the game telemetry is flawed. I need to investigate this further but for now, it is good to feel the pulse regardless of its accuracy. I run this at 95% (master) with 100% to the front and 35% to the rear.
There are three settings that affect what you feel when ridding rumble-kerbs: Road Impacts, Road Rumble, and Road Vibration. GT7 does not provide telemetry for Road Rumble, so that leaves us with Road Impacts and Road Vibration. I carried out numerous tests with these two data sources as I was very keen to accurately reproduce the rumble of kerbs that I used to feel so distinctly when racing for real. Note that many kerbs are smooth so you'll only feel these kerb types when mounting or dismounting them.
Anyway, I picked a circuit with proper rumble kerbs for my tests e.g. Circuit de le Sarthe, and found that Road Impacts and Road Vibration data differed in that one favoured the mounting/dismounting of the kerbs, whilst the other favoured the rumbles. I have been unable to find any documentation on these effects, and obviously the telemetry includes all road surface imperfections, not just the kerbs. I guess the actual data is down to the game being used.
At the time of writing, I found the best settings to be a master gain of 35% for each effect, with 100%/100% balance for Road Impacts, and 100%/70% (front/rear) for Road Vibration. I also set, for each effect, a base frequency of 30 Hz and a high frequency of 60 Hz on the assumption that this sets the limit of the effects' frequency range. But I could be widely off the mark here and am keen for some documentation to understand exactly what these settings do.
So with the caveat that I don't really understand what I'm doing with the settings just yet, and that what is good for my rig and preferred cars might be wrong for yours, this is how I have set up my haptics at the time of writing. And by golly it all feels super-immersive and worth all the time and effort to make and install all the kit. I do not use any other effects as the ones mentioned offer me everything I want in terms of total immersion. I normally have my amp's master volume set to about 45% and the vibrations are not noticed elsewhere in the house.
If you follow this article and add your own haptic feedback, please let me know in the comments below. Similarly, if you find any errors or have anything constructive to add, please let me know.
