Probably the best circular route for the Old Man of Coniston (6.4 miles)
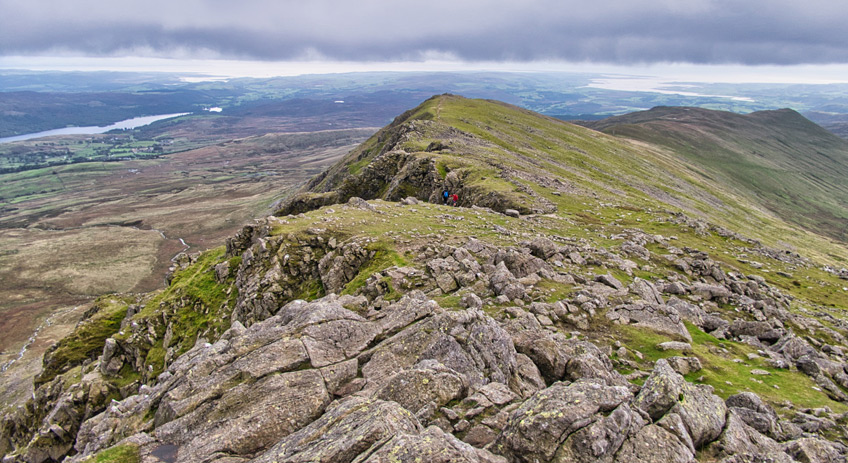
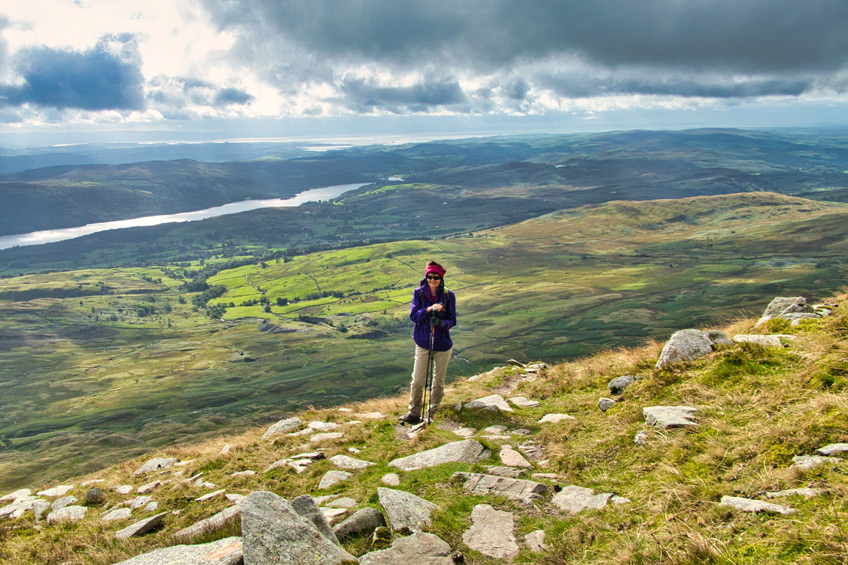
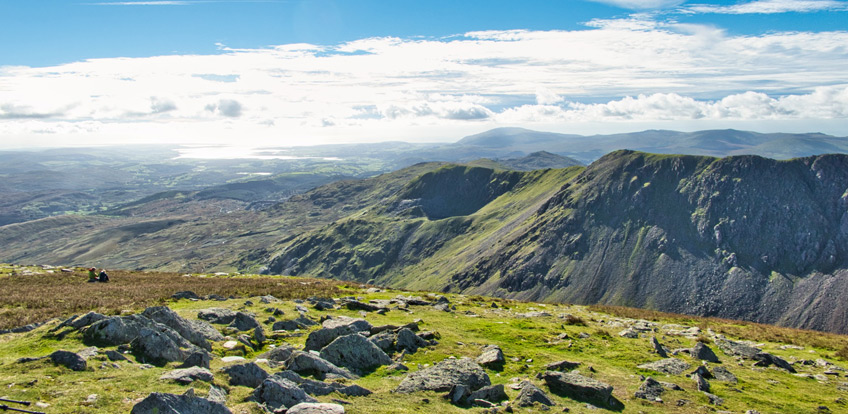
A lot has been written about The Old Man of Coniston and Dow Crag (shown above), as these giants of the Furness Fells have an understandable reputation as being one of the best hillwalking locations in the entire Lake District. The trouble is, as with any particularly popular walking destination, finding solitude away from the crowds can be a challenge, to say the least. Well worry not, dear reader, because following the popularity of my circular route of Snowdon, Roy the Boy (in my mind I'm still 19 years old) is here to guide you around what is truly a spectacularly majestic set of Cumbrian fells, whilst keeping completely clear of the popular Tourist Path full of cackling girls and yapping dogs running round people's legs whilst on half-mile-long leads.
First of all though, let's get the most obvious question out of the way: where does the 'Old Man of Coniston' get its name from? Well, 'old man' comes from the ancient Celtic, Alt Maen, 'alt' meaning 'high place' (as in alt-itude), and 'maen' meaning either 'stone', 'rock' or 'king', depending on which book you read. 'Coniston' is derived from the Norse term konigs tun, which means 'king's farm'. Thus the whole name, from what I can make out, translates as the high cairn or stone near the king's farm. Remember all that and you'll be able to impress your dinner guests for years to come!
As for the rest of the background information, I'll keep it short: the Old Man fell ('fell' being an old Norse word for 'mountain') is 803 metres or 2,632 feet high, is the highest peak in the Furness Fells, and the fourteenth highest in the Lake District. The mountain (in common parlance) has seen extensive copper and slate mining activity for around eight hundred years, leaving somewhat ugly abandoned mines and spoil tips on the eastern slopes. Famous author and walker Alfred Wainwright published five routes up the fell, his favourite being via the south-east ridge, which is where we're headed shortly, as it happens. Google is full of plenty more information about Coniston and the Furness Fells, so without further ado, let's move on...
Why this particular route?
When I first researched ways to climb up and down Coniston Old Man (as it's also known), I came across so many routes and differences of opinion that I decided to simply see how quickly we could get up and down in a morning. We took the most direct path we could find (at the time), up through the Bursting Stone Quarry on the eastern face and then straight up to the top. Then we descended on the Tourist path and wished we hadn't! In hindsight, the somewhat precarious track we took through the quarry was not the sort of route to publish, so with more research and experience, the route that follows is the one I am staking my reputation on. What alcoholic consumption and rowdiness has got to do with walking routes is anybody's guess, but there you go!
I soon discovered that Alfred Wainwright found the south-east ridge to be the most scenic route, and that a well-known and highly respected Coniston teacher named Jack Diamond had a route named after him which skirts the quarry on the eastern face and then takes in Black Crag, Goat's Hawse, Dow Crag, Buck Pike and Brown Pike. This seemed like almost the perfect route but with a few reservations: (1) it starts from Coniston town which means walking on roads, (2) it joins the Tourist Path for the last part of the main ascent, and (3) it can be difficult, if not near-impossible, to follow because of the sheer volume of paths, half-paths, non-paths and sheep-trails that look like paths on the south-east face.
So the route that follows below is largely the Jack Diamond Path but starting and finishing from the Walna Scar car park, and with a much more direct route for the second-half of the main ascent, taking in the south-east ridge with its stunning views. Ordinarily one might avoid a route that is not clear to follow, but that, dear reader, is the point of this article. It also gives some credence to the title of this blog section: Off-Piste.
Every good walk starts with a parking space
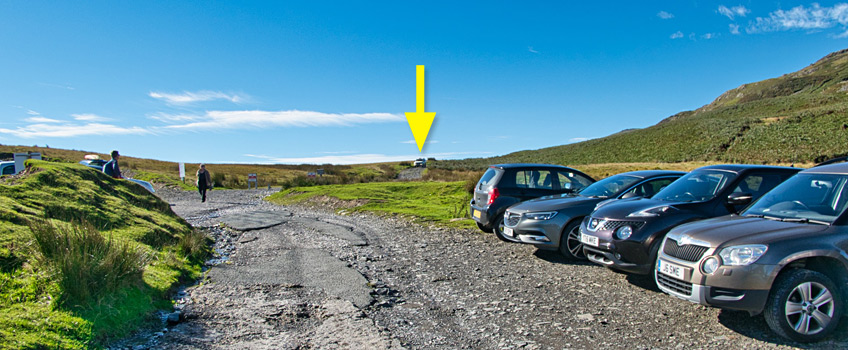
Walna Scar Car Park is located at the end of a long, rough and very narrow lane leading on from Station Road in Coniston. As with all such car parks for popular walking destinations, the trick is to get there early. In my experience, 9am is a good time to grab a space, but at noon on a sunny day, you'll need to wait for someone to leave before a space becomes available and even then you might have to fight for it! The signage makes it clear that parking is only allowed in designated bays, so park 'off road' at your peril!
The car park is at the very end of the road from Coniston, and has a gate which needs to be opened for vehicular access. There is another car park that you'll pass on the way up the lane, should you be unlucky at the top. The picture above shows one row of parking bays but there are plenty more around the corner.
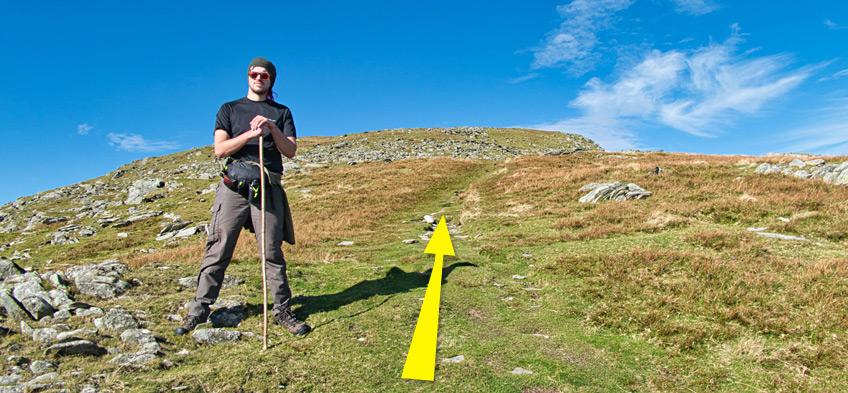
Parking is - at the time of writing - £4 for four hours or £8 for nine hours. I dare say that most people using a route to suit their experience, will take about four hours, so they'll need to pay for nine to allow for problems. £1 per hour would be much fairer in my opinion. Anyway, this walk took us four hours and five minutes with numerous short scenic and photo stops, so four hours should be quite doable as long as you are used to the challenge of a few thousand feet of ascents. Otherwise play safe and splash the cash ...or plastic ...or digital app (the machine takes any of these by way of payment). Once you are parked up and suitably kitted out with sensible clothing and equipment for a mountain hike, head off up the Walna Scar Road in the direction of the yellow arrow above.
Note that this path is not the one that the majority of people use to get to the Old Man of Coniston. The Tourist Route, as I call it, leads roughly north-north-west from the car park, up Big Hill, round the knoll of Stubthwaite Crag, through a disused quarry, alongside Low Water tarn, and then up a zig-zag path to the summit. It is shown on the OS map as a dotted green line, although obviously it is not the only green path on the map. The Tourist Route is well-kept, regularly used, and usually full of, well, tourists! If you don't have a map and a compass, or are not confident to navigate without clear paths and signage, maybe you would be better off following the Tourist Route.
And we're off...
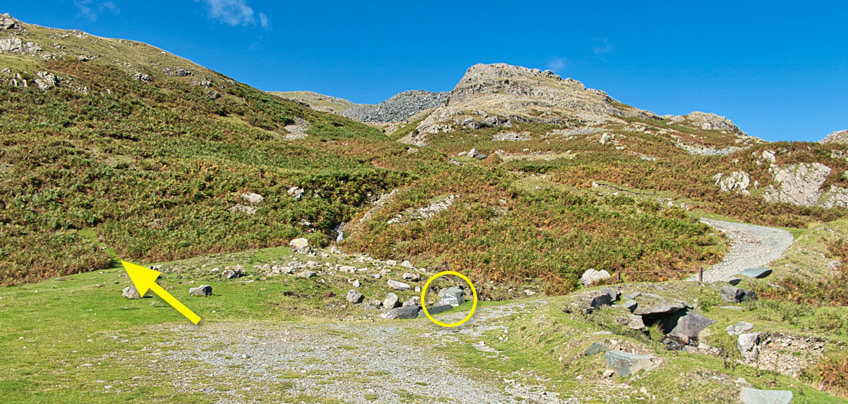
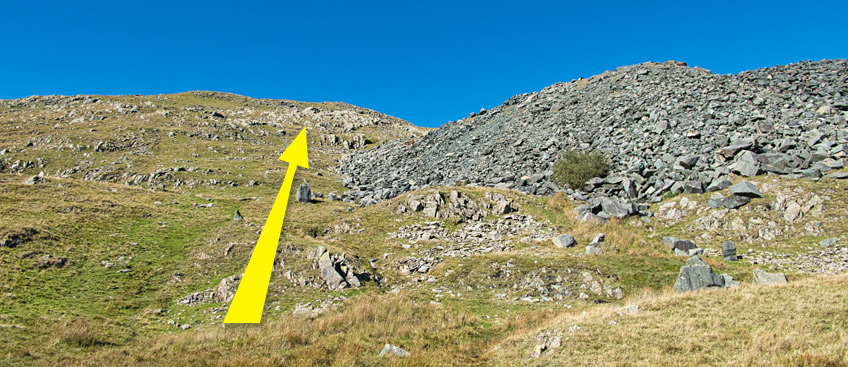
After a little under half-a-mile you will see the above scene on your right, with a rough road leading up to the Bursting Stone Quarry. The sign shown inside the yellow circle above suggests, by the position of its arrow, that the road is the main footpath to the Coniston Old Man. But whoever made the sign was clearly not a designer because that road leads to the quarry and potential danger for families with children! If the arrow was on the left of the writing then it might be a little more obvious that the Jack Diamond Path starts by my left yellow arrow above, and tracks uphill keeping close to the stream that runs between the path and the quarry road. Take the path, keeping just to the left of the stream as you climb uphill.
If foliage is obscuring the narrow path, either walk directly uphill through the foliage to the left of the stream, or take the rough road for a short distance until you can see an easy way to cross the stream. You can even follow the road all the way up to the quarry and then re-join the route at the far left corner of the quarry, but you shouldn't need to do this as tracking uphill reasonably close to the stream will soon have you alongside the massive spoil-heap shown two pictures down.
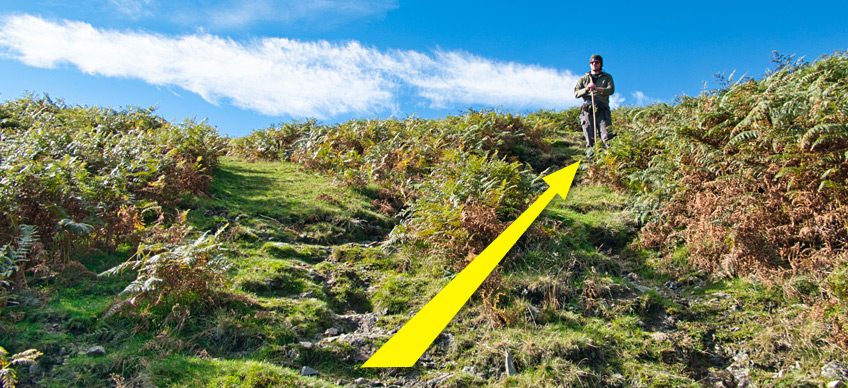
A short distance up the path, as you track round to the east, you will come to the split in the path shown above. This is probably the only part of the trek upwards that will take you significantly off my route if you get it wrong, as after this it's pretty much 'keep heading upwards until you reach the top'. My good buddy Tom here is doing his very best Gandalf impression to illustrate the correct path to take, and just in case he is not clear enough to you, I have added a big yellow arrow to assist you.
The arrow will probably have been nicked or blown away by the time you read this, but Tom has assured me that he will stand firm for at least a few weeks after I publish this, ready to assist you. Tip him as you pass; he's a good chap.
As you continue upwards, the 'path' becomes a 'non-path' in places and is criss-crossed by sheep trails and things that look remarkably unlike paths. In fact, rather than risk following a flock of mountain sheep to their favourite five-star haute cuisine grazing venue, just forget about the concept of paths and head on uphill in a roughly north-westerly direction close to the edge of the rather large spoil heap to your right.
If you have a compass, following an approximate 315° heading should take you all the way to the top. If you don't have a compass: why not? If the weather changes and you suddenly find yourself in cloud or fog, as long as you have a compass this is still quite a straightforward route. Without a compass you will probably very quickly find yourself wandering everywhere and anywhere but where you need to be! And please don't rely on your smartphone, because batteries run out, phones get smashed when you fall over, and they nearly always give incorrect readings when you're standing right next to a mountain full of granite.
In the picture above my arrow is pointing to a rocky outcrop that you can use as a way-marker. Just pick the most obstacle-free path upwards and you should be on grass for most of the way. That is not an instruction, by the way, as what you do for recreation is entirely up to you!
The nearer you get to the outcrop, the more obvious it becomes, as shown in the photo above, although it is much more prominent with the benefit of mother nature's binocular vision. And if you look back down from whence you came, you will see the tops of the spoil heaps that you have just walked alongside. You will also start to see Coniston Water in a more county-wide context.
Do keep looking behind and around you as the views on this route are many orders of magnitude better than the tourists will be seeing on their crowded journey. They will be too focussed on dog leads and letting people pass to have time for the few good views that they do have.
As you ascend beyond the top of the quarry, so you leave the Jack Diamond Path, although you probably won't notice it. You are now 'off-piste' but perfectly legal as everything around you is 'open land'. The going is steep, but not too much so, and you can keep to the grass if you wish (no comment).
The photo below is typical of the terrain and incline in this area, and shows my other half on a different day out (i.e. with different weather) to most of the other photos. You may also notice that she is standing on what appears to be a path. There are a few paths running across your route, and by all means follow them if you feel happier doing so - they'll all take you to the top, I'm sure - but if you want to follow the 'Roy Route', start to bear slightly left (west) as you climb, so that you end up on the south-east ridge.
The reason for this is the view. If you are on the ridge you will be able to see across to the massive wall of rock that is Buck Pike. If you can't see 'round the corner', just track a little more to the left until you are obviously on a gentle ridge (shown by a slight kink on my map). If you miss the ridge, fear not, you will still get to the top without any drama, it's just that the view will not be quite as good as it could be.
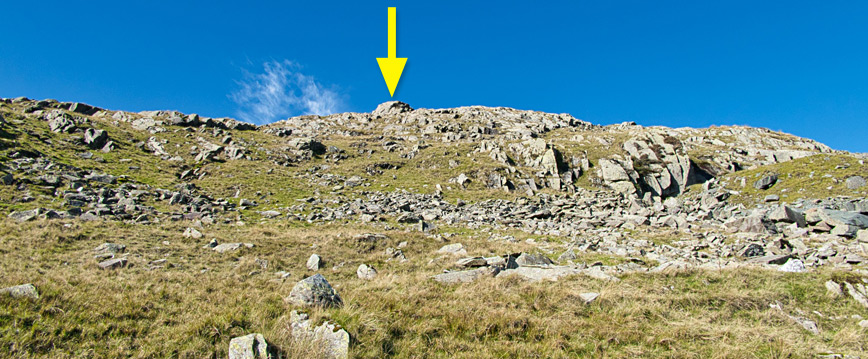
As the ridge rises and you get nearer to the top, a definite path becomes apparent, as shown by the yellow arrow below. Tom again suspected that my arrow might get nicked, so he stood guard while I took the photo, ready to wield his fighting stick and practice his latest Jeet Kune Do moves with anyone daft enough to challenge him. Good ol' Tom.
At a total distance of just over a mile-and-a-half so far, the Alt Maen (high cairn) finally comes into view as you climb the last few dozen metres, marking the completion of the first part of the walk, and the end of what has probably been an almost solitary climb.
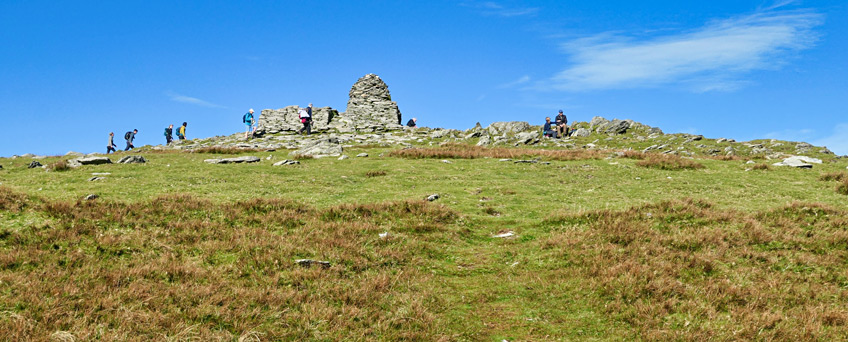
The Alt Maen comprises a slate platform with steps, which supports a prominent stone cairn. From this viewpoint on a clear day can be seen most of the southern Lake District and Lake District Peninsulas, Morecambe Bay with Morecambe and Lancaster on the other side, Blackpool Tower, Winter Hill in the Pennines, the Lancashire coast, and the Isle of Man. If you're wondering what the big rectangular building is on the other side of Morecambe Bay, it's the Heysham Power Station standing next to Heysham Port, from where freight ferries depart for Douglas on the Isle of Man.
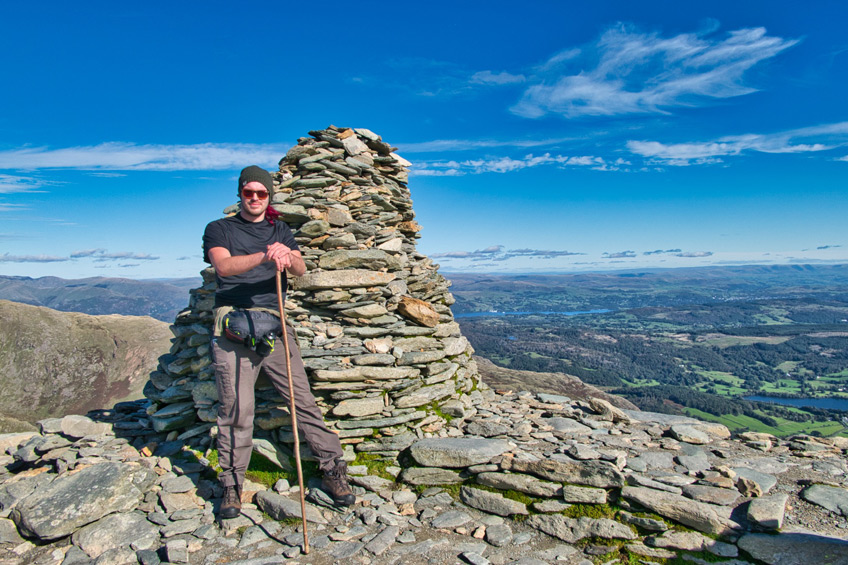
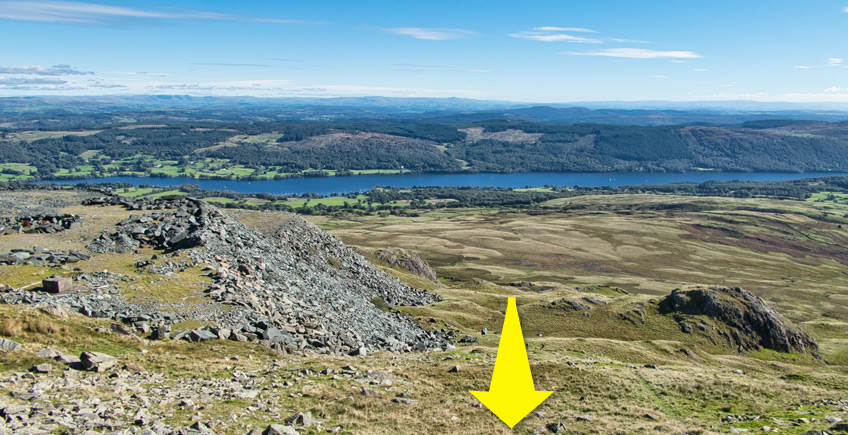
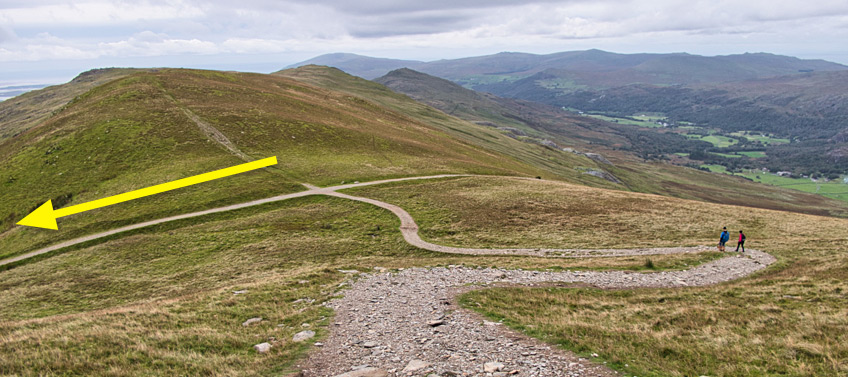
Take a moment to look across at where this route heads after its imminent short detour to Black Crag. The pinnacle of the mountain opposite is Dow Crag at 778m (just 25m lower than where we now stand), and we will soon be climbing the ridge-line up from Goat's Hawse to get there. From Dow Crag we will continue south to Buck Pike (at the head of the left arrow below), and then onto Brown Pike which can be seen more clearly in the second photograph below. As you might have noticed, we do have another climb ahead to get to Dow Crag, but from then onwards it's predominantly downhill back to the car park. As is always the case, these tiny 2D photos cannot possibly do the views justice, but at least they give you some idea as to why this area is so highly regarded by walkers.

Part Two: leaving the Old Man
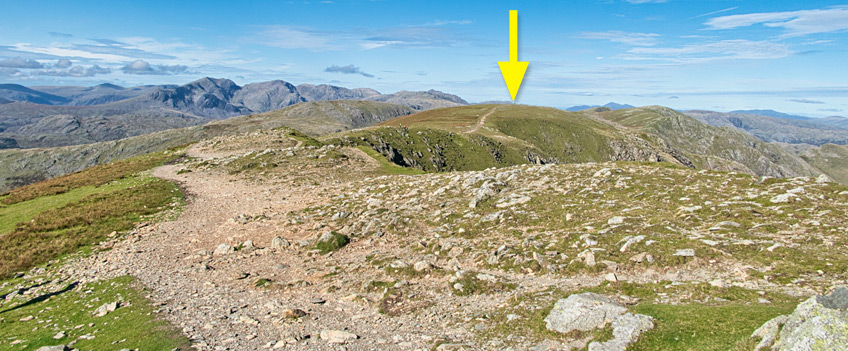
So here we go then: onward to explore more views. Looking north from the Alt Maen, you should be able to see a cairn on the horizon. It is not at all clear on this small photo, despite the yellow arrow, but in reality you should be able to see it quite clearly as long as you are not in cloud. If you are in cloud and you want to continue with the whole route, there are cairns every 50m or so to guide you along the ridge-line to the cairn (and back again). Just after you start to walk northwards, the path splits in two. The left fork leads directly down to Goat's Hawse, which you can take if the weather is bad or if you've walked to the cairn and back. Otherwise walk ahead to the cairn at Black Crag.
Once at the cairn, look down to the south-west and you should clearly see the previously mentioned path down from the Alt Maen and up again to Dow Crag. It forms a crossroad with a path from Little Pikes to Goat's Water at Goat's Hawse, which is where we are headed next.
According to almost any map that you can find of this area, there is a prominent, thick, dotted, bright-green path running directly from the cairn at Black Crag, down to the ridge of Goat's Hawse. Well we couldn't find it; not no path of any kind, innit! Not to worry though, the going is grassy with just the odd rock and boggy patch until you reach Goat's Hawse.
From here the path up to Dow Crag is much more obvious, as in there is one, and is again marked by regular small cairns which have been built to assist walkers navigate in bad weather or heavy snow. If you have clear vision, it will be patently obvious how to get to the top without inadvertently detouring to Goat's Water in a few seconds. If the cloud has closed in, follow the cairns and be aware that those tightly-packed brown lines on the OS map just to the left of your position, mean: 'steeper than you can possibly manage without climbing ropes, pitons and carabiners'.
Once near the top, a number of paths bear round to the right of the summit, but one path runs into the rocks stacked up before you. If you are fit and agile of body, by all means 'bag the hill'. But be very careful as the shape of the rocks are particularly dangerous in that if your foot slips on a damp rock - as happened with me just after I took the photo below - it can very easily get wedged in a vice-like grip of granite. I'm an experienced mountain walker and this was the first time I have ever managed to trap my boot (thanks for the speedy help, Tom), so be wise and take more care up there than I did!
Whilst on the subject of safety, note the sudden presence of low-slung, rain-bearing cloud just above our heads in the picture below, and compare it with the blue skies dominating the scenes of the photos above, taken just a short while previously. If ever there was a good example of how quickly the weather can turn, even when you are sure the day will be dry and bright, this is it.
Read my article about what to wear and carry when hillwalking, and always be prepared for cloud, fog, rain and injury. If I had broken my ankle high up on Dow Crag, my core-temperature would have dropped through shock and exposure, and I would most-probably have had to wait a long time to be rescued from such a tricky-to-reach position. I had with me a waterproof jacket, lightweight hat and gloves, food and water, emergency whistle and pocket-sized emergency blanket, so it wouldn't have been the death of me. Make sure you are equally well prepared!
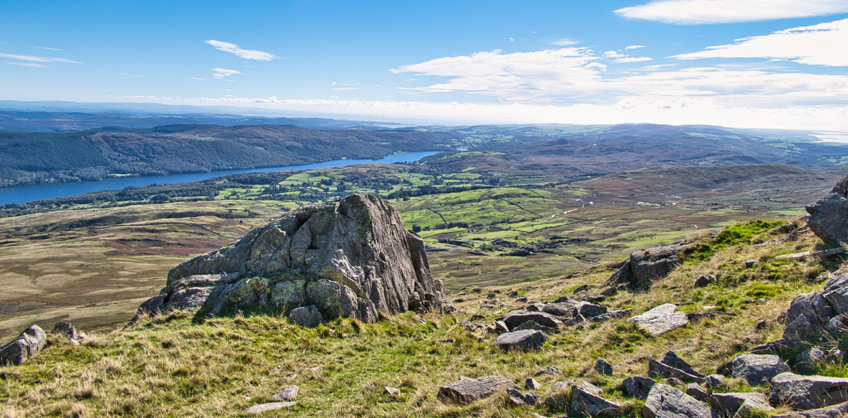
From Dow Crag, head south along the ridge-line pictured above, via the peak of Buck Pike to the cairn at Brown Pike. The views across to the Alt Maen, and down to Goat's Water and Blind Tarn are beautiful, as you might have guessed, so in many ways, this part of the route today is even better than the climb straight up the Old Man. The word 'tarn', by the way, comes from the old Norse word tjörn, which means a small mountain lake without tributaries.
You'll know you are at Brown Pike when the ridge-line stops and the path shown below drops down on your right to the south-west. It leads to a crossroad with the Walna Scar Road, which you should take in a south-easterly direction as shown below.
The home run
You are now on a very straightforward walk to the car park and should notice the temperature climbing as you are in the lowland foothills again. As you can see below, the path snakes eastward towards Coniston and is an easy-going end to an otherwise exhilarating trip into wildest Natureshire. The path splits and intersects other paths as you go, but just stick to the most obviously dominant road in every case and you can't go wrong.
If you complete and enjoy this fabulous route, please leave a comment below as it takes me longer to write routes up than it does to complete them, and I do it to be helpful - it's nice to know if I'm wasting my time or not. Similarly, if you've followed this route and feel that it can be improved, please let me know and I'll don my finest editing clothes in order to make any helpful changes.


")